
Pulse Sensor BPM:
The Getting Beats-Per-Minute, BPM, Tutorial !
PulseSensor_BPM Code Features:
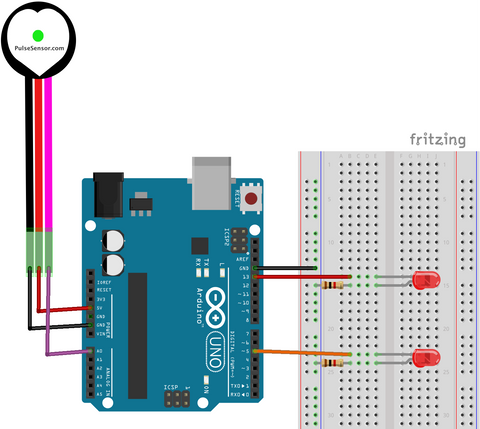
- Blinks LED on Pin 13 to a User's Live Heartbeat.
- "Fancy Fade Blink" an LED on Pin 5, to a User's Live HeartBeat.
- Calculates User's BPM, Beat-Per-Minute.
- Calculates User's IBI, the Interbeat Interval (Time between beats).
- Uses Arduino's Timer interrupt to calculate accurate BPM and IBI
- Serial.print the Signal, BPM, and IBI. Use this output to
- Arduino Serial Plotter
- Our Processing Visualizer App
- Our Pulse Sensor Mac App, or your project!
This project and code will read the PulseSensor waveform and calculate Beats Per Minute, BPM. It also calculates Interbeat Interval, IBI, which is the time between beats. The Arduino code uses a hardware Timer interrupt to measure the PulseSensor signal at an exact fixed rate (500Hz) in order to get a high-quality BPM reading.


Arduino Compatibility:
Our Pulse Sensor BPM code is written to use a hardware Timer on the chip that is the 'brains' of the Arduino. However, the Library does not accomodate all the myriad types of Arduino boards! If you are using an Arduino board that our BPM code does not support we have another example sketch that will work! Just click on
File > Examples > PulseSensor Playground > PulseSensor_BPM_Alternative
This Arduino sketch also defaults to print to the Arduino Serial Plotter, so if you want to use our visualizer, you will have to make the changes above.
Some Arduino boards don't have a hardware UART (Serial Port), and so we made an example that uses Software Serial so that you can use them anyway! Click on
File > Examples > PulseSensor Playground > SoftwareSerialDemo
This Arduino sketch also defaults to print to the Arduino Serial Plotter, so if you want to use our visualizer, you will have to make the changes above.
Playground Code Guide:
For an in-depth guide to preparing your Pulse Sensor Hardware and what to do with the parts in the kit, check out this handy GUIDE
More Ways To Visualize:
The BPM and IBI values get sent over Serial and can be visualized by the Arduino Serial Plotter, OR with our Processing Visualizer, or Pulse Sensor Mac App.
