
Getting (Calculating) BPM:
Three Cool Ways to Get BPM:
1) Getting_BPM_to_Monitor
- Where's the Beat? See your BPM change in real-time on Arduino’s Serial Monitor.
- Heartbeat Alert: Get a notification ("♥ A HeartBeat Happened!") whenever your heart skips a beat (literally).
- Library Know-How: Learn to use the PulseSensor Library like a pro.
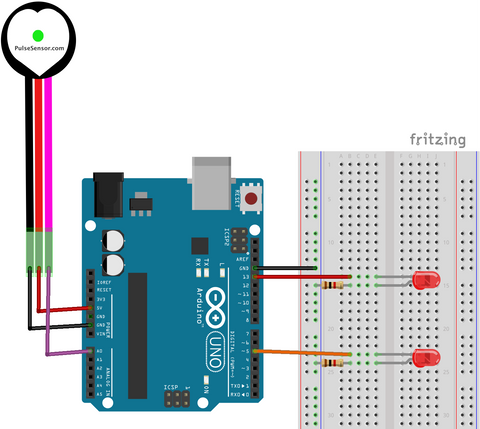
- LED Heartbeat: Visualize your heartbeat with a blinking LED on PIN 13.
2) PulseSensor_BPM_Alternative, For All Boards:
- Universal Compatibility: Works even with boards that don't support the standard PulseSensor_BPM.
- Software Serial: Ideal for boards without a standard Serial Port.
- No Hardware Interrupt: Smooth operation without hardware interruptions
In the PulseSensor Playground library, select:

3) PulseSensor_BPM, The Fancy and Most Accurate Way:
- Heartbeat LED: Watch an LED blink with your heart rate on Pin 13.
- Fancy Fade: An LED on Pin 5 mirrors your heart's rhythm with style.
- BPM & IBI Calculations: Get the numbers on your Beats Per Minute and the time between beats (Interbeat Interval).
- Accurate Measurements: Thanks to Arduino’s Timer interrupt.
- Real-Time Data: Serial.print the BPM and IBI for live tracking.
- Instant Data Sharing: Send your heart’s Signal, BPM, and IBI straight to serial. This means you can immediately level up with our Processing Visualizer App or get creative and integrate it into any serial-enabled app you're working on.
In the PulseSensor Playground library:


Notes on BPM & IBI Tracking
- Heartbeat Analysis: You'll measure the PulseSensor waveform to calculate BPM (Beats Per Minute). It's like understanding the rhythm of your own body!
- Timing the Beats: Find out the IBI (Interbeat Interval), which is the time between those beats.
- Precision Matters: We're using a hardware Timer interrupt in the Arduino code. This means we'll measure the PulseSensor signal at a super precise rate (500Hz) to get a high-quality BPM reading.
Don't Forget:
- Serial Baud Rate: In the data window's bottom right, pick the serial baud rate from a drop-down menu. Set it to 115200, or you’ll miss the action!
- Give It a Moment: It might take a sec for the signal to settle. What you'll see is the pulse waveform (super cool to watch!), the IBI in milliseconds (that's the line above), and your BPM (the line below).
More Ways To Visualize:
The BPM and IBI values get sent over Serial and can be visualized by the Arduino Serial Plotter, OR with our Processing Visualizer
